About a year ago the client came to me with a request to develop an embedded computer for the specific needs of an electronics company. There wasn’t anything particularly interesting about it: Cortex A-8 CPU utilizing the sub-GHz frequency spectrum, 512MB DDR3 memory, 1Gb NAND, lightweight Linux build-up. However, the target device containing the embedded computer had to face quite extreme outdoor environmental conditions, namely:
- broad temperature range tolerance (from -40 up to +85 degrees Celsius);
- humidity resistance;
- electromagnetic waves resistance;
- kV power supply pulses;
- protection against 4 kW static electricity;
- аnd many more things broadly touched upon in multiple state standards on special equipment*
One of the key requirements was to have the mean time to failure (MTTF) up to 10 years of operation. The producer was taking the responsibility to do warranty repairs within 5 years’ time, which therefore required a diligent and serious approach to avoiding failures. The final device consisted of all the assembling elements required for such kind of case. It had successfully passed all the tests. The problems started to develop right after the first serial consignment was produced and distributed across the departments for subsequent use in order to build-up the applied software. We have experienced a large number of returns accompanied with “not loading” complaints.
This was a FAILURE
Throughout the examination we revealed that 100% of failures were caused by the failing of NAND partition with rootfs file system, whereas the other units remained undamaged, safely mounted and easily read. The survey showed that the equipment refused to load again after the emergency power supply shutdown. Therefore, we started to check out what was going wrong and identify the cause. The file system boot failure could be caused by cutting off the power supply while writing to the storage. We initiated a test with the following steps:
- giving power supply,
- waiting until Linux boots and runs the test script (generating files and writing to the Flash) and
- subsequently cutting off the power supply.
We iterated the same test again and again with several devices. That kind of looping lasted more than an hour. It took each device to run about 2000 iterations on average before it refused to boot and rootfs partition was going down! Apparently, we have found the cause.
In pursuit of durability and reliability we employed SLC NAND as a ROM. The options to go with eMMC (embedded Multimedia Memory Card) were turned down due to a small number of writing rounds. Today eMMC doesn’t serve as the standard for the industrial implications. This is why we don’t have so many chips tolerating lower working temperature limit of -40C. The main limitation to its usage in industrial systems is the short warranty period. For the eMMC it’s about one year, while for the SLC NAND it is up to 10 years.
In our specific case FTL (Flash Translation Layer) should be carried out by CPU, whereas the eMMC based solution (or the common one SD «Secure Digital» Card) relies on an embedded controller responsible for the software’s interaction with the storage. This kind of advanced approach in turn drives the substantial enhancement of storage durability by giving the advantages of a flexible configuration of the final system combined with prolonging the life of the storage device by applying special wear leveling algorithms. (In fact, the FTL embedded in the eMMC also has wear leveling algorithms, but this is implemented in the “black box”).
In order to interact with the NAND device, we have several file systems on the market, namely JFFS2 and its successor UBI/UBIFS (due to Nokia), together with LogFS, their main rival. Considering all the input parameters we favored the UBI/UBIFS combination. It contains two software layers: UBI (Unsorted Block Images) working directly with the storage device and UBIFS (UBI File System) – literally the file system itself.
UBI’s main capacities are:
- Interacting with the partitions, enabling one to create, delete and change their size;
- Providing wear leveling across the storage device;
- Working with the bad blocks;
- Reducing the chance to lose data caused by emergency power supply cut offs and other kind of externalities.
In addition to the above stated, UBIFS is running journals.
Despite the fact that UBI and UBIFS were developed to handle cut-off tolerance requirements, the partition turned out to be damaged after being exposed to emergency shutdowns throughout the service period. If the rootfs directory is damaged, the device loses its working capacities as a whole. The chance of this happening is not so high. It can be stable throughout several months, up to several years, and recover after a series of power cut offs. Still, we can encounter this factor as the device is installed in a place with limited human access. Therefore, its failure can lead to severe outcomes.
The cause of the damage lies in the domain of the NAND physical structure. The data is written by pages. Prior to being written the page should be erased with all “1” symbols in it. The erasing is occurring block-wise. Such block is called physical erase block (PEB). In order to get the page erased you should delete the block as a whole. The whole block may contain a large number of pages, keeping in mind that the page weight is 4KB while the block is 256 KB. The UBI/UBIFS technique developers acknowledge the problem and explain this by so called “unstable bits “. They point out the four main events leading to the data losses from the storage device.
Major Reasons for Losses and Failures in NAND
- The power has been cut off before reference to the memory page is completed. After the reboot, the page may be read in the correct way, although it may return an error correcting code (ECC) mistake through every single attempt to read from it again. This happens because we have a new bunch of unstable bits that can be read either correctly or incorrectly.
- The power shutdown is occurring right upon the start of referring to NAND page. After the reboot, the page may be read correctly: all the “1”s (0xFF) will be read, but in some rare cases this area can give all the “0”s after the reboot session. Moreover, if you rewrite this page again, an ECC mistake may show up. The reason for this is, again, the unstable bits.
- Power shutdown while erasing the block. We might have the unstable bits after the reboot and the data in the block turns out to be damaged.
- The power is cut off after the erasing session is started. Once again, the block contains the unstable bits: returns the “0”s or the damaged data in the attempt to write the information in there.
The proper memory reading right after emergency cut off may occur on all cases; the journaling system won’t identify the forthcoming trouble. Along with it, the data can be damaged while further accessing this area. The actual number of such kind of “unstable bits” could exceed the bits recovered by the ECC algorithm. Therefore, the previously proper pages become unreadable, whereas the page that was unreadable becomes readable again. This kind of problem may deteriorate as the unstable bits may appear in the file system journal as well, as studies show this NAND part is the most frequently modified.
System Rescue
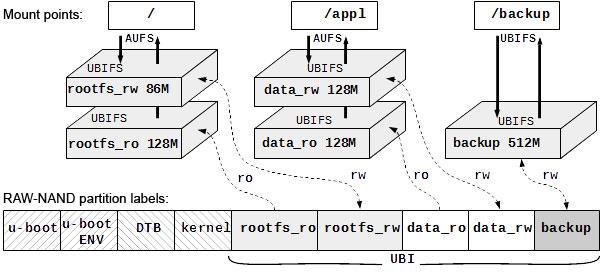
Increasing the robustness of the file system will be handled by adding the redundancy into the root file system architecture. The idea behind this was to create a virtual partition from the two physical partitions on the storage. The one partition should contain the rootfs image with read-only access. All the modifications taken place are written to the second partition accessible for both writing and reading. The second partition alone starts to be subject to damage after the emergency cut offs, as writing goes only on this partition. Another partition will remain in its initial shape. This kind of technology is known as union mount.
On top of that, we made a decision to break down the system software (namely rootfs, with the kernel initially being on the separate read-only partition) and the applied software into two different physical partitions. Our special equipment needs (large datasets manipulations) required allocation of the backup partition. Here, the sufficient memory storage (1GB) will be very helpful.
The union mount technique uses the aufs (auxiliary file system). As said before, the virtual merge of the two physical partitions is involved. The first partition contains the image of the root filesystem with read-only (RO) access, while the other one, being initially empty, serves for storing any modifications that have occurred. Therefore, it’s available for both writing and reading (RW) sessions. These two partitions are referred as branches in aufs terminology. Merging of file system branched is carried out during the process of mounting. As a result, the operating system sees the mounted space as a single directory. The kernel driver controls data access. The request for file reading is forwarded initially to the RW branch and the data is provided if available; otherwise, the file is read from the RO branch. During the writing process the files are directed to the RW branch. Upon file deletion, the label is created in the RW branch stating that the file has been deleted (the corresponding empty file is created with a prefix in the file name). The physical file retains itself in the RO branch. Such an approach avoids writing two partitions containing critical data. On top of that, having the read-only branch, we are generally enabled to add additional control over data integrity. This can be done by UBIFS tools by creating a static partition. The static partition has read-only access and contains the data protected by the CRC-32 checksum.
The prospected root file system architecture is shown on the diagram

The «rootfs_» contains the system part of the root file system responsible for OS operability, while the «data_» partition is intended to store the applied software, settings files, and databases. The «backup» partition is for the regular backup of the current settings and databases. The backup is done by the applied software.
«Baking» the Aufs
At time of the project development, the aufs was not included in the main Linux branch. Therefore, in order to work with it we had to apply kernel patches. To deploy the aufs technology on the target Linux you should do the following:
- Apply the kernel patches. You may find all the patches together with the “how-to” on the project web-site.
- Include the aufs in the kernel.
- Build a kernel.
- Build utilities to work with the aufs
- Transfer the kernel and utilities on target.
Checking this technique can be done on target by command:
mount -t aufs -o br=/tmp/rw=rw:${HOME}=ro none /tmp/aufs
Command format:
mount [-fnrsvw] [-t type_FS] [-o parameters] device directory

moun -t aufs -o br=/tmp/rw:${HOME} none /tmp/aufs
As a result, the content of the home folder will be in the /tmp/aufs directory. You may write and delete files as you wish, the contents of ${HOME} won’t change.
Looks good! After mounting the aufs we have got another issue to solve: how to force the system to start loading from it. By default, we are unable to point the kernel to the rootfs partition on the aufs through the cmdline. This partition doesn’t exist yet; it’s about to be created soon. Therefore, we need to mount the auxiliary aufs partition, execute the chroot on it during the boot right before the initializing process (process with PID=0, systemd in my case) followed by running /sbin/init. In order to solve those issues, the provisional initialization technique might be handy. The cmdline should contain the path for the script to run before starting the initialization daemon. We add the parameter to the cmdline:
init=/sbin/preinit
The script itself is written in shell, therefore we need all the required utilities available by the execution moment. By this we mean the whole partition with rootfs should have already been mounted! In order to get this done, we can use rootfs on ramdisk or load instantly from the rootfs partition, albeit in a read-only regime – either option is up to us. Then we edit the cmdline by adding the parameter (9 is number of mtd partition with rootfs_ro):
root=ubi0:rootfs_ro ro ubi.mtd=9
Preinit script
We have to mount the system partitions (needed to work with shell):
mount -t proc none /proc

mount -t tmpfs tmpfs /tmp

mount -t sysfs sys /sys
The rootfs_ro partition is mounted already; we had it for booting the system. Then we mount rootfs_rw to the temporary directory:
ubiattach -m 10 -d 1 > /dev/null

mount -t ubifs ubi1:$rootfs_rw /tmp/aufs/rootfs_rw
In case something goes wrong, we can format rootfs_rw. If it didn’t work out we can delete the partition and rebuild it again. Let’s try to mount one more time. Here I won’t touch upon the code; it introduces a lot of “magic numbers” defined by the NAND architecture. You’ve got to use UBI toolkit.
We copy the mount point of the current rootfs to the temporary directory:
mkdir -p /tmp/aufs/rootfs_ro

mount --bind / /tmp/aufs/rootfs_ro
We add another level of the structure – mount the aufs partition:
mount -t aufs -o br:/tmp/aufs/rootfs_rw :/tmp/aufs/rootfs_ro=ro none /aufs
The new partition with rootfs is accessible in /aufs.
And, finally, do the trick: transfer rootfs_ro and rootfs_rw mount points to the new partition:
mount --move /tmp/aufs/ rootfs_ro /aufs/aufs/ rootfs_ro

mount --move /tmp/aufs/ rootfs_rw /aufs/aufs/ rootfs_rw
We transfer the /dev too:
mount --move /dev /aufs/dev
The target directories for the mount point transfer should be built in advance.
We switch off the system partitions:
umount -l /proc

umount -l /tmp

umount -l /sys
Change the root file system and run the initialization process:
exec /usr/sbin/chroot /aufs /sbin/init
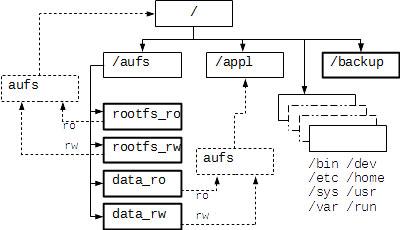
In the given script we follow the same rule. We do the layered binding for /appl and mount /backup. The diagram below shows the built architecture of the final root file system.

In order to increase reliability, we enabled the /backup partition with monopoly access by the only one utility responsible for backup and recovery. The utility itself lives in the «data_ro» partition.
Major Outcomes
As a result of all the actions above, we greatly enhanced the general durability of the system under the conditions of emergency power supply cut offs. Despite the fact we used the NAND to showcase the union mount technique of the root file system, this kind of approach is not limited by the type of the storage device and can be easily transferred on eMMC, SD, etc. For cases when the system is not dealing the actual accumulating of the data, but instead follows a certain algorithm (like the ordinary router) it might be feasible to use ramdisk as an RW branch while mounting the aufs partition.
P.S. And finally, consider using back-up power supply equipment, just in case….


